Saturday, March 31, 2012

Mini Nap Time

We've twirled through the purple bedroom, ending up with our last little corner of the room....

Nap time!


I like my beds to feel "lived" in...unmade, comfy cozy...

Yep...more salt pillows!

When making my bed cover, I lay a piece of pollyfill cut to size on the bed, then start layering the fabrics one on top of the next.  Folding and "smushing" ( I do allot of smushing), pulling and placing until they are just perfectly perfect to my liking. 

Now....

my secret here is...

I dampen the fabrics so they are pliable, fold able, wudge-able, creating all the little nooks and crannies..... of course if need be, I give them a tea bath for that old linen look.

Then I pull the fabric down on each side and hot glue them to the underside of the bed. 

Now, all you have to do is wait for the fabric to dry and you've got one lush looking bed that you'll want to hop into. 


A bit blurry...oh well, can't be good at everything.  hehehe


Didn't switch out the picture to one of my family members...this one was just too darn cute.

I think we've been in this room long enough...time to move on.

Have an eventful day in your dollhouse.

Never stop PLAYING...

Happy Weekend...

xoso

Sandy


Tuesday, March 27, 2012

Playing MINIS today.....

Starting out with a few more pictures of  the *purple* bedroom.

This room was inspired by the purple rug...I wonder whatever possessed me to buy a purple rug?
Cuz it's pretty?

I think the *odd* color combination of the rug and the couch is perfectly perfect.... it's so different, it works.


Pillows pillows pillows!

I have a secret for what I use in stufffing my mini pillows  (maybe its not a secret) can you guess what it is?

SALT! 

Yep, you read it right...salt.

It's really important to have pillows feel and look soft and bendable, plus...they plop down wonderfully because of the weight.

After they sat on the couch for a couple years (I didn't touch them) I picked them up and they were hard as a rock.  OH NO... like cement! 

I thought... "Well, that was a dumb idea, but it worked for years". 

Well..... after smushing them, the salt went right back to being soft...whew. 

You know how it gets hard in your canister?

  Did the same thing in fabric...but, no worries, it comes right back to life when "smushed". 

Saved by the "smush"!!!


We are working our way around the room.... bed next!


I'm going to move my dollhouse today, it's time to PLAY!

Have a mini-full day.

xoso

Sandy


Saturday, March 24, 2012

Mini Desk Set-up

Decided to set up a little office setting in the corner of a bedroom.

I made the books years ago, it's cardboard (like the ones I made for the kitchen) only I covered these with bias tape.  I like the grain of bias type...it's a little more textured.  I painted the edges with gold paint, bit of an elegant feel.
 
Blotter, from scrapbook paper...two pieces that I thought gave a little interest to the room.
More desk items are needed... letters, papers, pen and pencils... more work....
that'll be another day.  


This little picture is my granddaughter at about three and a half... she's now twenty one....wow, time flies when you're having fun? 


Isn't this little clock just too cute?  Didn't make it....it's cast metal, then painted.

I love the look.


Have a fun filled mini making weekend....

xoso

Sandy


Sunday, March 18, 2012

MINI changes are good!

It was time for something new.

Instead of playing with my "littles" today...
I decided to set up a photo shoot, create sweet mini vignettes and update my blog header.

Well, that was fun!
Very enjoyable!

Did you have fun?

xoso
Sandy


Wednesday, March 14, 2012

More new MINIS for the kitchen......

today.....


Didn't seem to get as much accomplished as I would have liked...but I had a good time designing and creating.

I shared my picnic-basket/suitcase (thrown together yesterday), today I  organized and placed it in the kitchen.


I was thinking I needed a chalk board someplace in the kitchen...oh, that empty space on the left of the hutch...perfect!.... this is what I came up with. 
 Wanna hear how silly I am? 
I thought "Oh I don't have any chalk board paint"....that could be a problem.
Then, I realized black paint would be just fine for the little one inch project I'd be making.

Isn't that just ridiculous?

I have to laugh at myself. 


Didn't wanted it to just "hang" on the wall...
I think you need as much depth and texture in these little rooms, with that said...

 digging through my old stuff I came across a pair of shutters.
  Bingo... perfect spot for it to hang.


Needed some cook books....


Grabbed the cardboard, cut into little squares, painted the edges, covered with wallpaper, then perused my magazines for little bitty words for the names of the books.

DONE!

Easy peasy!

Don't they just make the counter?


Oh...see the little cupboard stuck in the corner?  I dug that out so my canisters had a home. 

The more minis the better....

Hope you had fun today.

Did you make anything new?

Have a fun evening.

xoso

Sandy


Tuesday, March 13, 2012

Minis: Are you hungry? Welcome to my kitchen

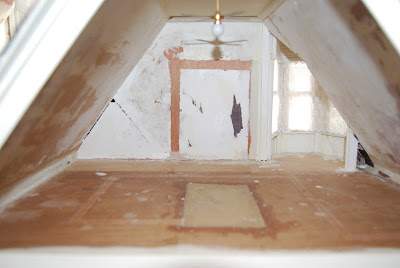
I chose the hardest room in the house for the kitchen...who puts a kitchen in the room with slanted ceilings?  

 I did. 

Wanted to make it a kitchen/dining room/breakfast nook....and, this was the only room that was big enough....but a challenge. 

It turned out better than I anticipated...

What do you think?


I had an issue with the pot rack...where was it going to go???
  Because of the slanted ceiling, there needed to be some creative way to hang it and still fit in all the furniture.
 
Light bulb went on! 
 I'll take a decorative piece of outside trim and turn it into a unique ceiling piece that would hold the pot rack. 

I have quiet a few Besqac pieces of furniture but, I didn't want to go that direction with this kitchen.....so, I had to dig through my older minis to see what I could come up with.
 
Don't get rid of your old *littles* you never know when you can use them.

Back in the day the kitchen units/cabinets were a beautiful mahogany...Bespac, of course...but, I painted them.. OH NO... I actually took perfectly perfect furniture and painted it.

  Well, they just didn't work for me any longer.
I use to be afraid to redo good pieces of furniture...but, no more.  I can paint with out batting an eye. 
  
So, I made it look old and shabby.  Notices the long twisted wire pulls that I created for the fronts of the units.  

The lace curtain was made from the one inch pleater... that little sucker comes in handy.


A good shot of the wire pulls.... two pieces of wire twisted together and shoved in the holes. 

 I need more cute things to go on this unit.... more things to make..OR BUY.


I seem to have an overkill of suitcases...you guessed, I like to buy them.

Got a great idea to make it a picnic case...

 Much more work needed...it needs to be cute and look like what it's suppose to be, instead of all the goodies just thrown in there. 
 You get the idea.

I have so many things to  FINE TUNE and CREATE.... that's the fun part for me. 


The dessert table is waiting for all the little sticky fingers to arrive.


I thought my vision of a FRENCH feel and look would rise from the ashes...but, don't think I accomplished that.

Oh well... it is what it is...think you could call it a little bit country..with a tad of shabby chic. 

What ever it is, I'm happy with my two days of work. 

Now, the fun part....making and designing some new accessories for the room. 
 Cookbooks, real pillows, finished picnic basket, napkins and place mats,  and.... little accessories to set around to complete the look. 

The unfinished  look on the left side of the hutch will be filled with pictures...just couldn't decide which ones would work. 

Must think!

I'm getting all my rooms in some kind of order, then I'll work on the *fine tuning* of the entire house, room by room.

Have a lovely day doing what makes you HAPPY.

xoso

Sandy


Sunday, March 11, 2012

Mini kitchen make over...whew....what a mess!!

I have to say, I didn't do it anything like I was going too.
I'd planned to make it all shabby chic...but, it didn't fall that direction. 
You know, mini worlds have a mind of their own.

I had to rip all the paper off the walls, how ugly is that?
Then figure out how and what to do.

It's all a work in progress and who knows, it might change more...oh heck, I'm sure it will change more.

Now I'm going with a *Frenchy* look...what ever that is????

I have to design it with what I've collected....lets see what that turns into. 

Here's my mess! 


I had to tear off all the wallpaper... ick, that wasn't fun. 
 You're probably wondering whats going on in the middle of the floor.... Well, that's covering up the hole where the staircase is SUPPOSE to go.  I don't like staircases..they take up tooooo much room. 

Okay...now to address the wallpaper issue.   I was worried that putting paper on the uneven wall would be a disaster, so...... I put it on cardboard, then glued the cardboard to the wall. 
Success!
You are never going to believe what the wallpaper is??? 

 You know those old vintage photo albums, with the soft paper,  yummy carmel color...yep,  that's what I used.  Now, that's thinking outside the box, don't ya think?
  Doesn't it look kind of suede like?  If you can't see it...you'll have to take my word for it...it looks suedey.
  (I have my own language)

It's making me happy.


Happy Dance! 


Now, the floor issue. 

I have a couple options....

 My daughter suggested cork for the flooring...thats what you are seeing here.

Not sure if it's the final answer, but it looks pretty good.

Now the room is taking on a completely different look.


I repainted the kitchen units... they are sitting/laying holding down the cork floor. 

 What a sight.

I grabbed a few things to stage the look.... now, what will I use?

Your guess is as good as mine as to what the end result will be....


I chose these brown pieces of furniture...they could get painted white.  We'll see.

So much more work....

TOMORROWS ANOTHER DAY.

How did your day go?

Any mini playing?

xoso

Sandy


Saturday, March 10, 2012

Minis all over the place

And....so am I!

Scattered would be the right word!

Jumping from one vignette to another, can't seemed to get focused.
We all are that way, right?

I want to redo the entire color scheme of the kitchen, but...I'm to lazy to sit and work...so, for now I'm just playing.
One room after another. 

I'm so smitten with islands.


This has been the look for a few years...now it's time to switch it up and make it "shabby"!
I want the cabinets, walls, furniture all white and yummy.

Sooooo, bye bye green.
So much work, the entire room has to be redone..... it's just like doing a remodel in our big houses.
Any mini person will tell you that. 


Had a great time at the Online Miniature Show today.

Did you check it out?

Play nice.

xoso

Sandy


Wednesday, March 7, 2012

Minis: Another room

Deciding on how to create a mini room takes lots of thinking!
Putting on my thinking cap!
Where should everything be "put and placed"?
Lace?  Fabric?  Wood? Colors?
So many questions....

I'm starting here....


With a passion for dolls, I must have some in my mini world. 
She looks sweet sitting on the bed, doesn't she? 
I made the bed with bits of cotton and lace... I love the soft colors....pooofy...fluffy... it's an *ice-creamy* kinda feel.
  Ice-creamy, you ask? 
 Well, that's my term for the look and feel of my rooms...they all have to be "ice-creamy"...soft and lush. 

We might be having tea and biscuits, they look pretty cute sitting there.  Hummmm

Please sit and have a sip.


So, this shall be the start of my next room....time to start moving in. 


Have a fun filled mini day.

xoso

Sandy